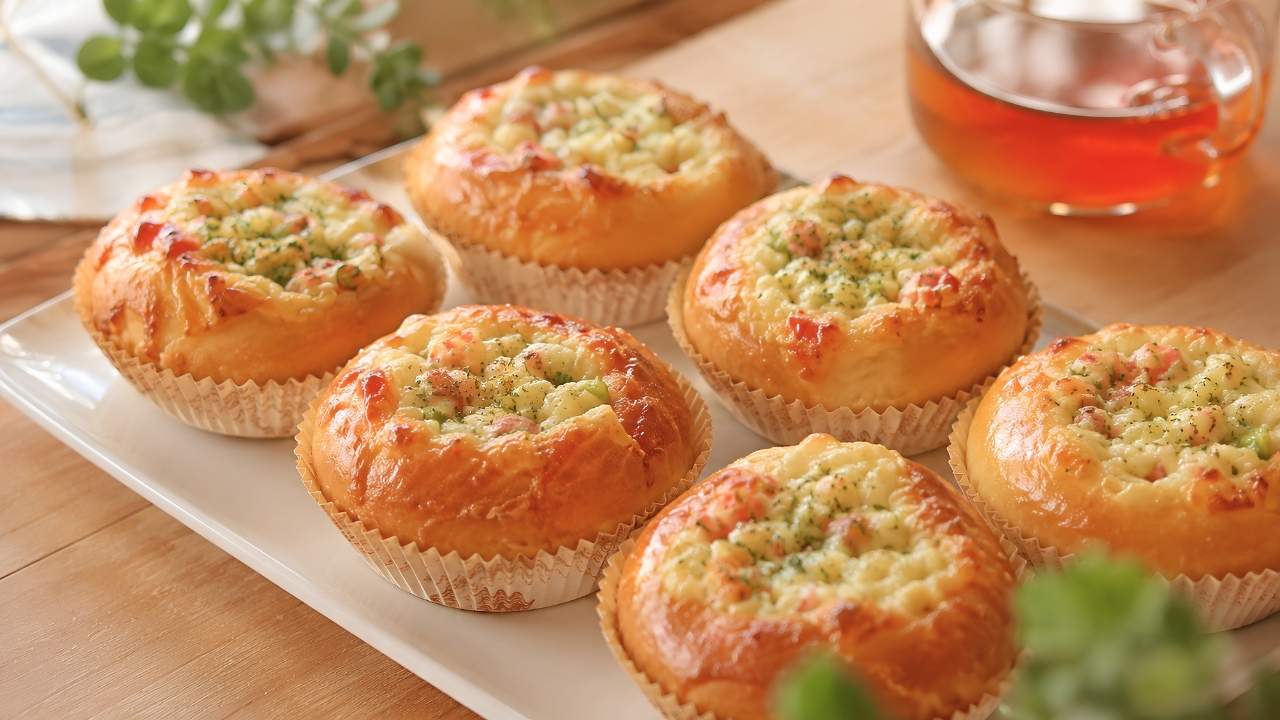
Easy Savoury Mini Buns with Melted Cheese: Mini buns filled with melted cheese are one of the most satisfying savory treats you can prepare at home. Their soft texture, rich cheesy center, and bite-sized convenience make them a favorite for family gatherings, tea-time snacks, lunchboxes, and party platters. Whether served warm straight from the oven or enjoyed at room temperature, these delicious mini buns offer the perfect combination of comfort and flavor.
Unlike many complicated baked snacks, savory mini buns are surprisingly easy to make. With simple ingredients and a little patience during the dough-rising process, you can create bakery-style buns that look professional and taste incredible. The melted cheese inside adds a creamy richness that makes every bite irresistible.

In this guide, you’ll learn everything about making easy savory mini buns with melted cheese, from ingredients and preparation tips to serving ideas and storage recommendations.
Why Mini Cheese Buns Are So Popular
Mini cheese buns have become increasingly popular because they combine convenience, flavor, and versatility. Their small size makes them ideal for sharing, while the cheesy filling appeals to both children and adults.

These buns are perfect for:
- Birthday parties
- Family gatherings
- Evening snacks
- School lunchboxes
- Office meetings
- Holiday celebrations
- Picnic baskets
- Game-day snacks
Their popularity also comes from their ability to pair well with various dips, soups, and beverages.

What Makes These Savoury Mini Buns Special?
Unlike ordinary bread rolls, these mini buns offer a soft and fluffy texture with a gooey melted cheese center. The outer crust remains lightly golden while the inside stays tender and moist.
Key features include:
- Soft and airy dough
- Rich cheese filling
- Easy preparation
- Customizable flavors
- Perfect portion size
- Great for make-ahead meals
The balance between the fluffy bread and creamy cheese creates a snack that feels both comforting and indulgent.
Ingredients Overview
The beauty of this recipe lies in its simplicity. Most ingredients are pantry staples found in many kitchens.

| Ingredient | Quantity | Purpose |
|---|---|---|
| All-purpose flour | 3 cups | Main structure of buns |
| Instant yeast | 2 tsp | Helps dough rise |
| Sugar | 1 tbsp | Activates yeast and adds flavor |
| Salt | 1 tsp | Enhances taste |
| Warm milk | 1 cup | Creates soft dough |
| Butter | 3 tbsp | Adds richness |
| Egg | 1 | Improves texture |
| Cheese cubes or shredded cheese | 1½ cups | Filling |
| Egg wash | 1 egg beaten | Golden finish |
Using quality cheese significantly improves the flavor and texture of the final product.
Choosing the Best Cheese
The cheese you choose plays a major role in the final result. Different cheeses provide different melting characteristics and flavor profiles.

Popular choices include:
Mozzarella
Mozzarella creates the famous cheese pull effect. It melts beautifully and provides a mild flavor.

Cheddar
Cheddar delivers a sharper taste and richer color.
Monterey Jack
This cheese melts smoothly and has a creamy texture.

Gouda
Gouda adds a slightly sweet and buttery flavor.
Mixed Cheese Blend
Combining mozzarella and cheddar often produces the best balance between flavor and meltability.

Step-by-Step Preparation Process
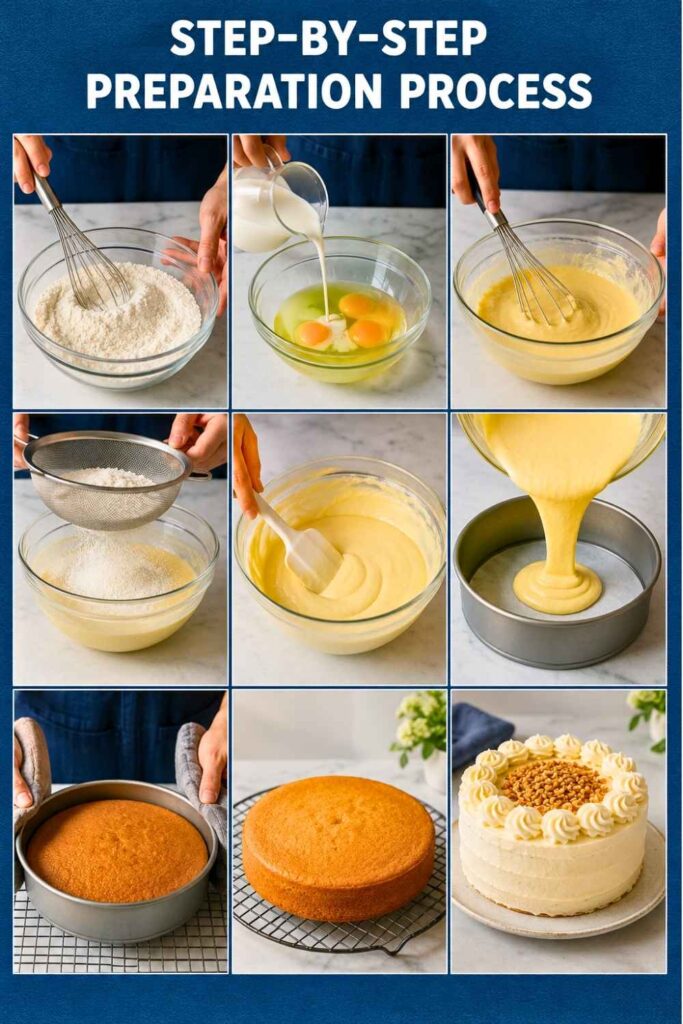
Making mini buns requires several stages, but each one is straightforward.
Step 1: Activate the Yeast
Mix warm milk, sugar, and yeast in a bowl. Let it sit for 5–10 minutes until foamy.

This confirms that the yeast is active and ready to work.
Step 2: Prepare the Dough
In a large bowl combine:
- Flour
- Salt
- Egg
- Butter
- Activated yeast mixture
Mix until a dough forms.
Step 3: Knead the Dough
Knead for approximately 8–10 minutes.
The dough should become:
- Smooth
- Elastic
- Soft
- Slightly tacky
Proper kneading develops gluten, which creates the soft texture.
Step 4: First Rise
Place dough in a lightly greased bowl.
Cover and allow it to rise for 1–2 hours or until doubled in size.
Step 5: Divide and Shape
Punch down the risen dough.
Divide into equal small portions.
Flatten each piece gently.
Step 6: Add Cheese Filling
Place a cube or spoonful of cheese in the center.
Seal carefully by pinching the edges together.
Roll gently into smooth balls.
Step 7: Second Rise
Arrange buns on a baking tray.
Leave space between them.
Cover and let rise for 30–40 minutes.
Step 8: Bake
Brush with egg wash.
Bake at 180°C (350°F) for approximately 15–20 minutes.
Bake until golden brown.
Tips for Soft and Fluffy Buns
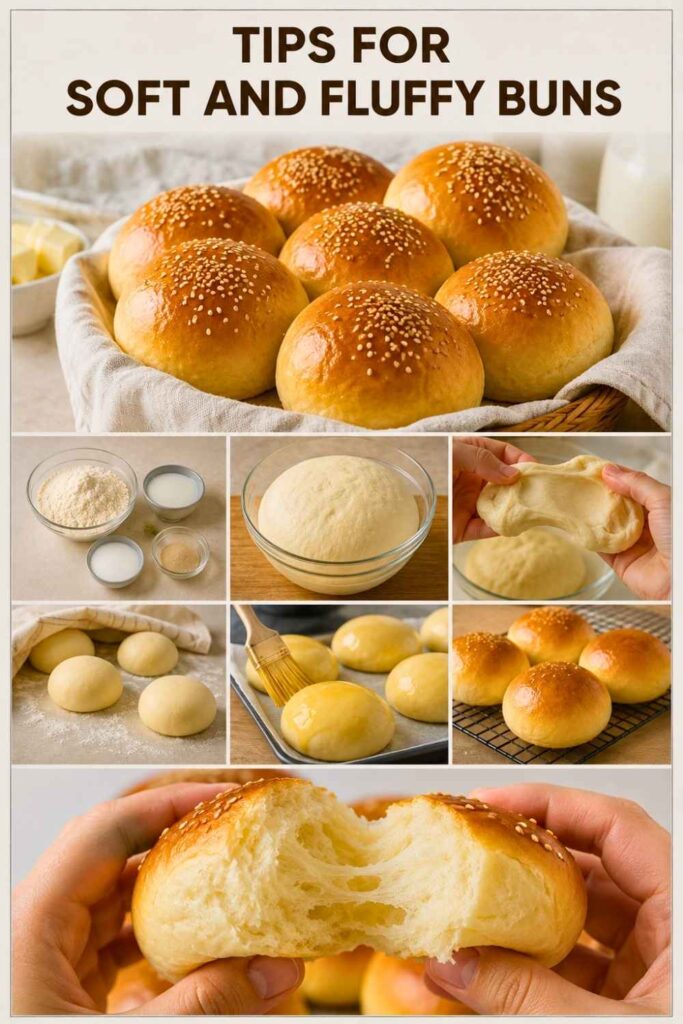
Several techniques can improve the texture dramatically.
Use Warm Ingredients
Milk should be warm but not hot.
Overheated liquid can kill yeast.
Knead Thoroughly
Well-kneaded dough produces lighter buns.
Avoid Excess Flour
Too much flour makes buns dense and dry.
Allow Proper Rising Time
Rushing fermentation reduces softness.
Brush with Butter After Baking
A light butter coating keeps the crust soft.
Flavor Variations You Can Try
One of the best aspects of mini cheese buns is customization.
Garlic Cheese Buns
Add garlic powder to the dough and filling.
Herb Cheese Buns
Mix oregano, parsley, or basil into the dough.
Spicy Cheese Buns
Add chili flakes or jalapeños.
Onion Cheese Buns
Include finely sautéed onions.
Pizza-Style Buns
Add pizza sauce and mozzarella filling.
Bacon Cheese Buns
Combine crispy bacon bits with cheese.
These variations help create unique flavors for different occasions.
Common Mistakes to Avoid
Even simple recipes can go wrong if basic mistakes occur.
Using Expired Yeast
Inactive yeast prevents proper rising.
Overstuffing the Buns
Too much filling can leak during baking.
Insufficient Kneading
Results in dense texture.
Baking at Incorrect Temperature
High heat may brown the exterior before the interior cooks.
Skipping the Second Rise
Reduces fluffiness and volume.
Avoiding these errors ensures consistently excellent results.
Serving Suggestions
Mini cheese buns are incredibly versatile.
Serve them with:
- Tomato soup
- Creamy mushroom soup
- Garlic dip
- Ranch dressing
- Marinara sauce
- Hot tea
- Coffee
- Fresh salads
They can function as appetizers, snacks, or side dishes.
Perfect Occasions for Mini Cheese Buns

These buns fit nearly every event.
Birthday Parties
Easy to serve and universally loved.
Family Gatherings
Great addition to buffet tables.
School Lunches
Portable and filling.
Holiday Celebrations
Can be customized with festive flavors.
Game Nights
Perfect finger food.
Potluck Events
Simple to transport and share.
Storage and Reheating Tips
Proper storage helps maintain freshness.
Room Temperature
Store in an airtight container for up to 2 days.
Refrigeration
Keeps fresh for up to 5 days.
Freezing
Freeze for up to 2 months.
Wrap individually before freezing.
Reheating
Oven: 5–7 minutes at 160°C
Microwave: 20–30 seconds
Air Fryer: 3–4 minutes
Warm reheating restores the melted cheese texture.
Nutritional Overview
While exact values depend on ingredients used, mini cheese buns generally provide:
| Nutrient | Approximate Amount Per Bun |
|---|---|
| Calories | 120–180 |
| Protein | 4–6 g |
| Carbohydrates | 15–20 g |
| Fat | 5–8 g |
| Calcium | Moderate |
| Fiber | 1–2 g |
Using whole wheat flour can increase fiber content.
Why Homemade Mini Buns Are Better Than Store-Bought
Homemade versions offer several advantages.
Fresh Ingredients
You control ingredient quality.
No Unnecessary Preservatives
Cleaner ingredient list.
Better Flavor
Freshly baked bread tastes superior.
Customizable Fillings
Choose your favorite cheeses and seasonings.
Cost Effective
Often cheaper than bakery alternatives.
Healthier Options
Reduce sodium and additives as desired.
The homemade experience also adds satisfaction and creativity to the cooking process.
Key Highlights
- Soft and fluffy homemade bread texture.
- Delicious melted cheese filling in every bite.
- Easy recipe suitable for beginners.
- Ideal for parties, gatherings, and snacks.
- Highly customizable with herbs, spices, and additional fillings.
- Can be prepared ahead and reheated easily.
- Family-friendly recipe loved by both kids and adults.
- Cost-effective alternative to bakery products.
- Works as an appetizer, side dish, or lunchbox treat.
- Stores well and freezes successfully for future use.
FAQs
Can I make mini cheese buns without eggs?
Yes. You can replace eggs with yogurt, milk, or commercial egg substitutes while maintaining a soft texture.
Which cheese melts best for these buns?
Mozzarella is the most popular option because it melts smoothly and creates a stretchy cheese pull.
Can I prepare the dough the night before?
Yes. Refrigerate the dough after the first rise and continue shaping and baking the next day.
Why did my buns turn out dense?
Dense buns usually result from insufficient kneading, inactive yeast, or inadequate rising time.
Can I use whole wheat flour?
Yes. You can replace part of the all-purpose flour with whole wheat flour for added nutrition.
How long do mini cheese buns stay fresh?
They remain fresh for about 2 days at room temperature and up to 5 days when refrigerated.
Can I freeze baked mini buns?
Absolutely. Properly wrapped buns can be frozen for up to 2 months.
What herbs pair well with cheese buns?
Oregano, parsley, basil, thyme, and rosemary work exceptionally well.
Can children help make these buns?
Yes. Kids can assist with shaping dough and filling buns, making it a fun family activity.
What dips go best with mini cheese buns?
Marinara sauce, garlic butter dip, ranch dressing, and spicy tomato dip are excellent choices.
Final Words
Easy Savoury Mini Buns with Melted Cheese are the perfect combination of softness, flavor, and convenience. Their fluffy texture and gooey cheese center make them an irresistible choice for nearly any occasion. Whether you’re preparing snacks for guests, packing lunchboxes, or simply craving a warm homemade treat, these mini buns deliver outstanding results every time.
The recipe is beginner-friendly, highly customizable, and suitable for countless flavor variations. Once you master the basic technique, you can experiment with herbs, spices, vegetables, and different cheeses to create your own signature version. Freshly baked, golden, and filled with melted cheese, these mini buns are guaranteed to become a favorite in your kitchen and a crowd-pleasing addition to every gathering.